📹 Videochat - Kiosk Flow
Introduction
This article will guide you through the steps to implement the Video Call - Inbound feature integrated with NICE InContact ACD/IVR.
The Flow
The Kiosk flow primarily involves creating a landing page for your company, which will be connected with NICE InContact ACD/IVR. Here’s how it works:
Customer Interaction: When your customer clicks on your custom start button on the landing page, it triggers the integration to create a work item in your company queue. This work item routes the session to one of your agents.
Video Session Initiation: On the customer’s side, a Surfly session with video enabled will start.
Agent Interaction: Once the agent starts the video session on their side, both the agent and the customer will be connected and interacting via video in a matter of seconds.
This streamlined process ensures a seamless and efficient video call experience for both your agents and customers.

Implementation Steps
To implement this flow, follow these four milestones:
Configuring the Studio Scripts
Creating the Landing Page
Integrating the Landing Page with the Studio Script
Testing the Kiosk Flow
Quick Start
Before starting the implementation, please download the scripts linked below:
Studio Scripts for Download:
Surfly Signaler: Used to manage the work item correctly in a queue
IB_Video_WI: Entry point for video functionalities before creating the work item
Configuring the Studio Scripts
Creating the Studio Scripts
Open the NICE inContact Studio:
Log in with an admin rights account.
Import the Studio Script:
Click on
File > Import from File (Ctrl + I).Select
Surfly_Signaler.Save the file in the root folder.
Click on
File > Import from File (Ctrl + I)again.Select
IB_Video_WI.Save the file.
Create a Work Item Skill
Log in to your ACD account.
Navigate to ACD Skills:
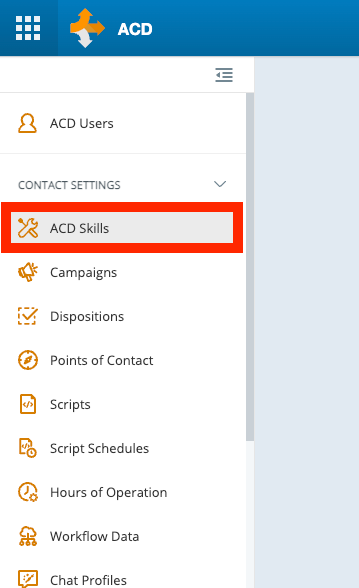
Click on
Create Newand selectSingle Skill.
Select Media Type: “Work Item”.
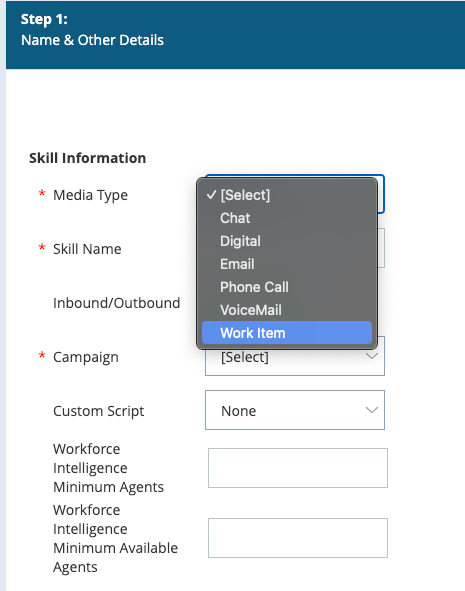
Add a name and select the campaign.
Click on
Create.
Create a Point of Contact
Within the ACD panel:
Click on
Points of Contact.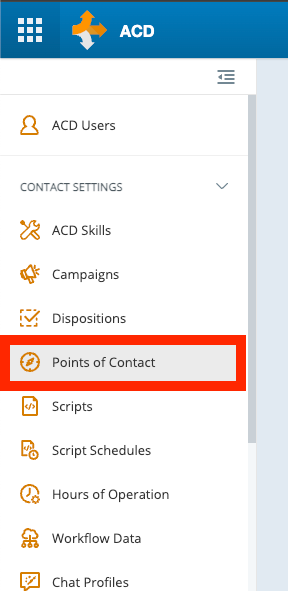
Click on
Create Newand selectSingle Point of Contact.
Select Media Type: “Work Item”.
Add a name.
Select the skill created previously.
Select the script
IB_Video_WI.Click on
Create Point of Contact.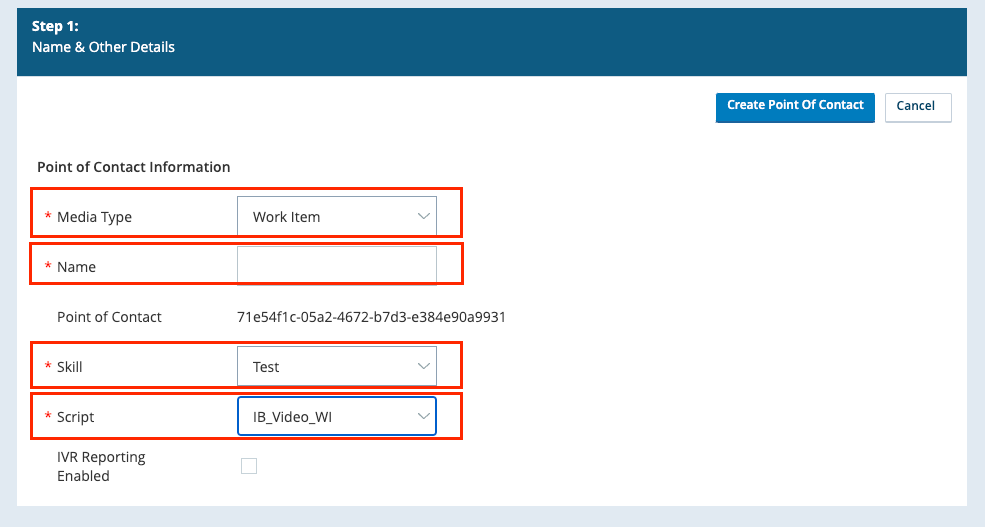
Configuring the Scripts
Configuring the IB_Video_WI Script
Open the IB_Video_WI Script:
Navigate to the
SkillReqactions.Select the skill you created previously.
Save the file.
Configuring the Surfly_Signaler Script
Open the Surfly_Signaler Script:
Navigate to the
Queuewiaction.Select the point of contact you created previously.
Save the file.
By configuring these scripts as specified, you will ensure that the integration works correctly with the skills and points of contact set up in the NICE InContact ACD/IVR system.
Creating the Landing Page
To create the landing page, we have provided an example that you can use. Simply copy and paste the code from the Landing Page Code into your environment to get it working.
Integrating the Landing Page with the Studio Script
After copying and pasting the landing page code into your environment you going to need to replace the variables below:
        var nicBusNumber = 'XXXXXX';
        var nicChatPOC = 'XXXXXX-XXXX-XXXX-XXXX-XXXXXXXX';
        var clusterNiC = 'b32';
        var surflyWidgetKey = '134f5fd2ac8842c0a1cd6062818eee74';
        var videoSignalerURL = "https://home-b32.nice-incontact.com/inContact/Manage/Scripts/Spawn.aspx?scriptName=Surfly_Signaler&bus_no=XXXXXX&scriptId=XXXXXX&skill_no=XXXXXX&p1=&p2=&p3=&p4=&p5=&Guid=XXXXX-XXXX-XXXX-XXXX-XXXXXXX";
Retrieving Necessary Information for Integration
To fully integrate your landing page with the NICE inContact system, you will need the following details: nicBusNumber, nicChatPOC, videoSignalerURL, clusterNIC and surflyWidgetKey.
Retrieve nicBusNumber
This number is your Business Unit number with NICE inContact. You can find this number in your NICE inContact account settings or by contacting your account manager.
Retrieve the nicChatPOC
Navigate to the Point of Contact:
Go to
ACD → Contact Settings → Points of Contact.
Select Your Chat Point of Contact:
Choose the specific chat point of contact you set up for this integration.
Copy the Point of Contact URL:
Copy the poc number provided in the interface.
Get the videoSignalerURL:
Navigate to ACD:
Go to
ACD → Contact Settings → Scripts.
Select the Script:
Choose the
Surfly_Signalerscript.
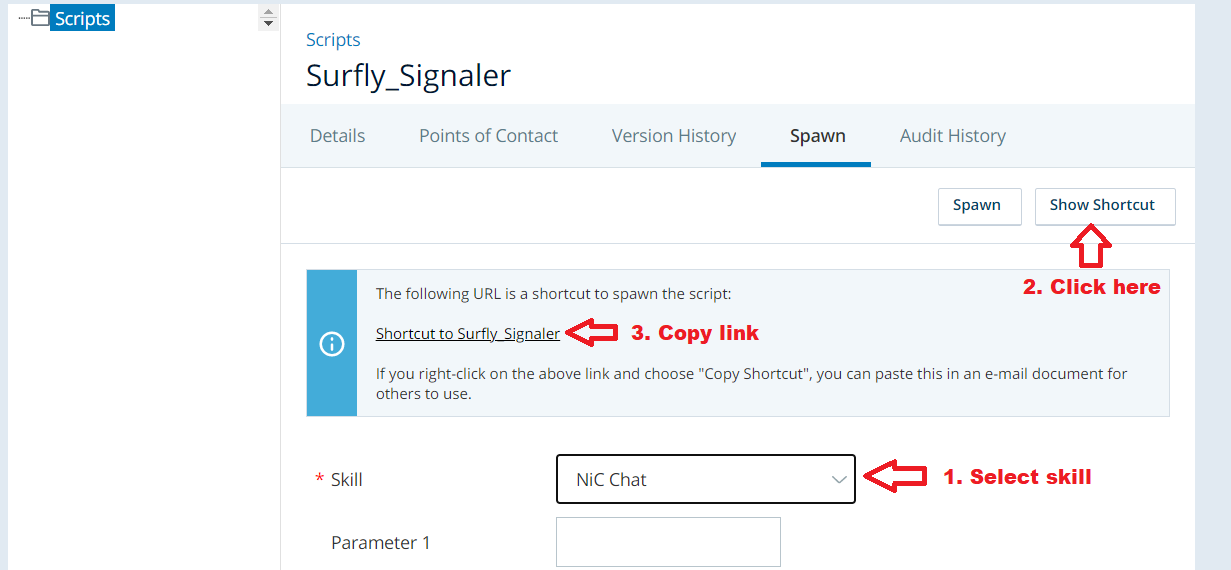
Configure Spawn Links:
Go to the
Spawnsection.Select the chat skill that you will be using for this integration.
Click “Show Shortcut” and copy the URL from the “Shortcut to Surfly Signaler” link. This URL is the Signaler Spawn URL that you will use in the JavaScript integration file.
Retrieve clusterNIC
This number identifies your cluster with NICE. If you do not know your cluster, you can find it by following these steps:
Retrieve the Video Signaler URL:
Navigate to your video signaler URL setup in NICE inContact.
Identify the Cluster:
Look at the beginning of the URL. The cluster identifier is the letter followed by the two numbers at the beginning of the URL.
Example URL:
https://home-b32.nice-incontact.com/inContact/Manage/Scripts/Spawn.aspx?scriptName=Surfly_Signaler&bus_no=XXXXX&scriptId=XXXXX&skill_no=XXXXXX&p1=&p2=&p3=&p4=&p5=&Guid=XXXXX-XXXXX-XXXX-XXXX-XXXXXXX
In this case, the cluster identifier is
b32.
Retrieve surflyWidgetKey
To retrieve your surflyWidgetKey, follow these steps:
Navigate to the Surfly Dashboard:
Open your browser and go to the following link: Surfly Integration Dashboard.
Locate the Widget Key:
Once on the integration page, find and copy the
widgetKey.
Testing the Kiosk Flow
To ensure your Kiosk flow is functioning correctly, follow these steps:
Network Accessibility:
Deployment:
Alternatively, you can deploy your landing page and integration to a publicly accessible server. This ensures Surfly can interact with your setup without network restrictions.
Testing:
Once deployed or accessible, test the Kiosk flow to ensure that everything is working as expected. Verify that the integration between your landing page, Surfly, and NICE inContact is functioning properly.
Follow Basic Requirements:
Make sure you adhere to the basic requirements specified by Surfly. You can access these requirements here to ensure your setup meets all necessary conditions.
